This is the second part of a three part series on creating a custom workflow activity for ILM 2.0. A reminder that in order to create and build this solution you will need an implementation of the ILM 2.0 Beta 3 server with a copy of Visual Studio 2008 Professional Developer edition installed on it. You can read the first entry here: How to Create a Custom ILM 2.0 Beta 3 Workflow Activity - Part I
I want to again mention my two colleagues Brad Turner and David Lundell for their support and contributions to this effort as well as ILM itself. Both are ILM MVPs and their blogs are worth exploring whenever you have questions about ILM.
In Part I, I laid out all the steps required to create the project and get it ready for developing the code. In Part II I will show you how the project develops to the point where we have the ILM compatible workflow foundation activity defined and in Part III I will show you how to add the UI class that allows the activity to be listed in the available activities in ILM Process Designer.
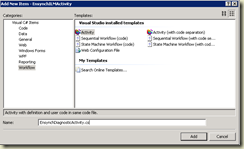
Picking up from where we left off, create a new class file named:
EnsynchDiagnosticActivity.cs
Use the Activity template in the Workflow category as shown below.
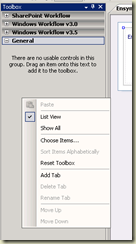
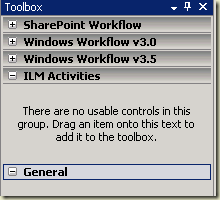
NOTE: You will probably have to add the ILM custom activities to your toolbox so right click on the toolbox and select "Add Tab" and add a new tab named "ILM Activities".
You will end up with an empty new category:
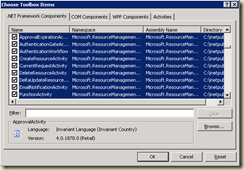
Right click in the ILM Activities space and select the "Choose Items …" option.
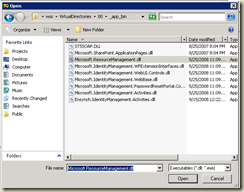
Select the "Browse…" button and navigate to the _app_bin folder of your SharePoint web site and select the Microsoft.ResourceManagement.dll library.
Press Open. If you sort the resulting list by Namespace you will see all the activities highlighted for this library.
Figure 1‑7 - Visual Studio, Toolbox Items
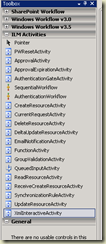
Press OK and the activities will be added to your ILM Activities Toolbox.
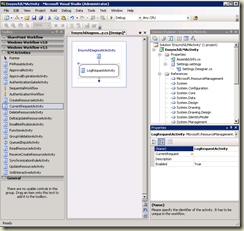
Drag a CurrentRequestActivity onto the design surface and rename the activity "LogRequestActivity". Your activity should look like it does below:
Figure 1‑9 - Visual Studio, WF Designer
Right click on the design surface and select View Code
In the code we need to add the references to the ILM object model and also a reference to the collections object mode which many of the dictionary items are built from. And since we are potentially going to be working with some diagnostics level bits we add that along with System.IO since we’re going to be writing to a file.
using System.Diagnostics;
using System.Collections.Generic;
using Microsoft.IdentityManagement.WebUI;
using Microsoft.ResourceManagement.Workflow.Activities;
using Microsoft.ResourceManagement.WebServices.WSResourceManagement;
using Microsoft.IdentityManagement.WebUI.Controls;
using Microsoft.ResourceManagement.Utilities;
using System.Collections.ObjectModel;
using System.IO;
Now we need to add a variable that will hold the data associated with the ILM request type. We'll call that currentRequest. For organizational purposes I like to isolate different sections of my code into regions. We'll locate this code in the "Activity Properties" region.
public RequestType currentRequest;
Now, because we are building a diagnostic activity we will want to write the diagnostics to a file in a folder of our choice. In addition we will want to provide a name that that will allow us to pinpoint where we have placed a copy of this activity in our workflow. So we need three additional properties that we will create in the user interface component of this activity. We create these as dependency properties, which will allow the ILM design surface to set the properties of the activity and have them persist into the workflow definition. These properties actually show up as attributes of the activity definition in the XOML workflow definition we will create in the ILM portal using our activity.
So we create three properties, LogActivityName, LogFolder and LogFile:
        public static DependencyProperty LogActivityNameProperty =
                    DependencyProperty.Register("LogActivityName", typeof(string), typeof(EnsynchDiagnosticActivity));

        [Browsable(true)]
        [DesignerSerializationVisibility(DesignerSerializationVisibility.Content)]
        [Category("Properties")]
        public string LogActivityName
        {
            get { return (string)this.GetValue(EnsynchDiagnosticActivity.LogActivityNameProperty); }
            set
            {
                this.SetValue(EnsynchDiagnosticActivity.LogActivityNameProperty, value);
            }
        }

        public static DependencyProperty LogFolderProperty =
                    DependencyProperty.Register("LogFolder", typeof(string), typeof(EnsynchDiagnosticActivity));

        [Browsable(true)]
        [DesignerSerializationVisibility(DesignerSerializationVisibility.Content)]
        [Category("Properties")]
        public string LogFolder
        {
            get { return (string)this.GetValue(EnsynchDiagnosticActivity.LogFolderProperty); }
            set
            {
                this.SetValue(EnsynchDiagnosticActivity.LogFolderProperty, value);
            }
        }

        public static DependencyProperty LogFileProperty =
                    DependencyProperty.Register("LogFile", typeof(string), typeof(EnsynchDiagnosticActivity));

        [Browsable(true)]
        [DesignerSerializationVisibility(DesignerSerializationVisibility.Content)]
        [Category("Properties")]
        public string LogFile
        {
            get { return (string)this.GetValue(EnsynchDiagnosticActivity.LogFileProperty); }
            set
            {
                this.SetValue(EnsynchDiagnosticActivity.LogFileProperty, value);
            }
        }
Now let's go back to the design surface. We need to connect the CurrentRequestActivity we placed into our activity to the currentRequest parameter we created.
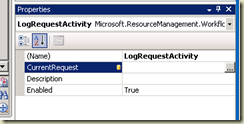
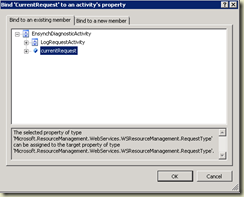
Pick the ellipses to the right of the CurrentRequest property.
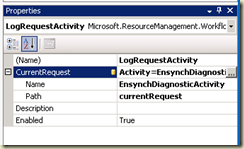
Select the currentRequest (this is the variable we created in the code) and select OK. If you open up the CurrentRequest property now it will show how it is connected to our code. A little side note here: we could have selected the “Bind to a new member” tab and created the “currentRequest” parameter right from here instead of manually coding it in as we did above.
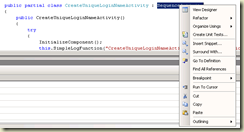
Save this and then go back to the code. Let's take a quick look at the SequenceActivity that our activity is built from. Right click on the SequenceActivity interface and select "Go To Definition"
Figure 1‑13 –Selecting the “Go To Definition” option on the SequenceActivity class
NOTE: You should see the following definition:
Figure 1‑14 –Summary view of the SequenceActivity Class Definition
For our purposes we are going to implement an override of the OnSequenceComplete event handler and the HandleFault event handler in case we run into a problem.
So now back to our code. I'm going to paste in the code I am going use for these two events which looks like what you are seeing below. In the “OnSequenceComplete” method I am writing out the object type and the request type as well as cycling through the request parameters and workflows dictionary to write those out as well. For the object type and request type I am using a couple of helper functions that we’ll insert a little further down.
#region Event Processing

protected override void OnSequenceComplete(ActivityExecutionContext executionContext)
        {
            try
            {
                SequentialWorkflow containingWorkflow = null;
                if (!SequentialWorkflow.TryGetContainingWorkflow(this, out containingWorkflow))
                {
                    throw new InvalidOperationException("Unable to get Containing Workflow");
                }
                //
                // Output the Request type and object type
                //
                this.SimpleLogFunction("Request Object Type    = \"" + this.GetObjectType() + "\"", "", EventLogEntryType.Information, 10002, 100);
                this.SimpleLogFunction("Request Operation Type = \"" + this.GetOperation() + "\"", "", EventLogEntryType.Information, 10002, 100);
                //
                // UpdateRequestParameter derives from CreateRequestParameter.  Since we only need PropertyName / value pairs,
                // simplify the code to work on CreateRequestParameter only.
                //
                ReadOnlyCollection<CreateRequestParameter> requestParameters = this.currentRequest.ParseParameters<CreateRequestParameter>();
                //
                // Traverse CreateRequestParameters in and print out each attribute in the request
                //
                this.SimpleLogFunction("Cycle Through the Request Parameters", "", EventLogEntryType.Information, 10002, 100);

                foreach (CreateRequestParameter requestParameter in requestParameters)
                {
                    this.SimpleLogFunction("RequestParameter (\"" + requestParameter.PropertyName + "\")",
                                           " = \"" + requestParameter.Value.ToString() + "\"", EventLogEntryType.Information, 10002, 100);
                }

                this.SimpleLogFunction("Cycle Through the Workflow Dictionary", "", EventLogEntryType.Information, 10002, 100);

                foreach (KeyValuePair<string, object> dItem in containingWorkflow.WorkflowDictionary)
                {
                    this.SimpleLogFunction("Dictionary Entry (\"" + dItem.Key + "\")",
                                           " = \"" + dItem.Value.ToString() + "\"", EventLogEntryType.Information, 10002, 100);
                }
            }
            catch (Exception ex)
            {
                this.SimpleLogFunction("Diagnostic Log Entry Request Exception", " = '" + ex.Message + "'", EventLogEntryType.Error, 10005, 100);
            }
            finally
            {
                base.OnSequenceComplete(executionContext);
            }
        }
        protected override ActivityExecutionStatus HandleFault(ActivityExecutionContext executionContext, Exception exception)
        {
            SimpleLogFunction("HandleFault", exception.Message, EventLogEntryType.Error, 1000, 100);

            return ActivityExecutionStatus.Closed;
}
#endregion
Notice I keep calling a function named SimpleLogFunction. So we need to add one additional section, the Utility Function region that holds that routine. Here I simply (hence the name) create/open the file in the folder specified and append a record containing the specified entry to the file. This is also where we add our two helper functions to output the request type and object type.
#region Utility Functions

private void SimpleLogFunction(string functionName, string Message, EventLogEntryType type, int eventID, short category)
     {
          string delim = "";

          using (StreamWriter mylog = new StreamWriter(Path.Combine(this.LogFolder, this.LogFile), true))
          {
              mylog.WriteLine(DateTime.Now.ToString("yyyy-MM-dd hh:mm:ss") + ": " +
                              this.LogActivityName + ": " +
                              functionName + ", " + Message);
              mylog.Close();
          }
      }

private string GetOperation()
   {
            switch (this.currentRequest.Operation)
            {
                case OperationType.Create:
                    return "Create";
                case OperationType.Delete:
                    return "Delete";
                case OperationType.Enumerate:
                    return "Enumerate";
                case OperationType.Get:
                    return "Get";
                case OperationType.Pull:
                    return "Pull";
                case OperationType.Put:
                    return "Put";
                case OperationType.SystemEvent:
                    return "System Event";
                default:
                    return "Unknown Operation";
            }
    }

 private string GetObjectType()
    {
            return currentRequest.TargetObjectType;
    }

#endregion
So that's it for creating the workflow activity itself. Let's stop and build this solution just to make sure we did everything correctly.
In the third and last post in this series, we'll create the ILM UI class that pulls the whole solution together and allows us to end up with a custom workflow activity that we can see in the ILM Process Manager Design Surface. Stay Tuned.


1 comment:
Thanks Paul, keep the posts coming!
Post a Comment