This is the third part of a three part series on creating a custom workflow activity for ILM 2.0. A reminder that in order to create and build this solution you will need an implementation of the ILM 2.0 Beta 3 server or the RC Candidate with a copy of Visual Studio 2008 Professional Developer edition installed on it.
Sorry for taking so long to get this part out. I got stuck in a bit of the economic downturn we are all experiencing and fortunately, instead of having nothing to do, have spent the last 6 weeks building a software application for a customer and this is the first time I have come up for air.
If you want to download the source for this project you can find it here: ILM 2 Customer WF Activity on CodePlex.
I want to again mention my two colleagues Brad Turner and David Lundell for their support and contributions to this effort as well as ILM itself. Both are ILM MVPs and their blogs are worth exploring whenever you have questions about ILM.
In Part I, I laid out all the steps required to create the project and get it ready for developing the code. In Part II I we looked at how the project develops to the point where we have the ILM compatible workflow foundation activity defined and in Part III I will show you how to add the UI class that allows the activity to be listed in the available activities in ILM Process Designer. We'll also dig into how to install and configure the custom activity, add it to an existing Process workflow and see the results of our work.
Now let us create the class that will allow us to see our custom activity in the ILM Process Design Surface. Follow these steps to build the ILM Activity:
First let us create a new class named EnsynchDianosticActivityUI.cs. We also need to add the references we need to support ILM as well as the workflow engine and, since we will actually be building a .Net web control, we need to add the ASP.Net references as well.
using System.Workflow.ComponentModel;
using System.Workflow.ComponentModel.Design;
using System.Workflow.ComponentModel.Compiler;
using System.Workflow.ComponentModel.Serialization;
using System.Workflow.Runtime;
using System.Workflow.Activities;
using System.Workflow.Activities.Rules;
using System.Web;
using System.Web.UI;
using System.Web.UI.WebControls;
using System.Web.UI.HtmlControls;
using System.IO;
using System.Diagnostics;
using Microsoft.ResourceManagement.Utilities;
using Microsoft.IdentityManagement.WebUI;
using Microsoft.ResourceManagement.Workflow.Activities;
using Microsoft.IdentityManagement.WebUI.Controls;
using Microsoft.IdentityManagement.WebUI.Controls.Resources;
We are also going to change the namespace that I use for the interactive components to: EnSynch.ILM.Activities. This class needs to implement the "ActivitySettingsPart" interface so well add that to our class definition and allow it to flow out the implementation of our class for us (see below)
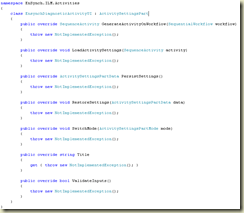
The resulting class structure for us to flesh out is shown below:
So again, we are going to add some helper functions that will help us create our user interface. These will create all the user interface components we need to show the user in order for them to provision this activity in the ILM Process Design Surface. Note: The EnsynchSwish.jpg file is included in the root folder of the solution in case you want to use it to see how it appears on the design surface. I created an Images folder in my SharePoint website root and am referencing the image file from there in the code below.
         #region Utility Functions

        private void InitializeControls()
        {
            Table child = new Table();
            child.Style.Add("background-image", "/Images/EnsynchSwish.jpg");
            child.Width = Unit.Percentage(100.0);
            child.BorderWidth = 0;
            child.CellPadding = 2;
            //
            // We need an activity name for our instance, a folder path to where to write the file and a text box to hold our filename
            // which we will default to myLog.txt
            //
            child.Rows.Add(AddTableRow("Activity Name:", "txtActivityName", 64, false, "Diagnostics"));
            child.Rows.Add(AddTableRow("File Folder Path:", "txtFilePath", 256, false, "C:\\"));
            child.Rows.Add(AddTableRow("Diagnostic File Name:", "txtFileName", 64, false, "LogFile.txt"));

            this.Controls.Add(child);
        }

        private TableRow AddTableRow(String labelText, String controlID, int maxLength, Boolean multiLine, string DefaultValue)
        {
            TableRow row = new TableRow();
            TableCell labelCell = new TableCell();
            TableCell controlCell = new TableCell();
            Label olabel = new Label();
            TextBox oText = new TextBox();
            // Add the To:
            olabel.Text = labelText;
            olabel.CssClass = base.LabelCssClass;
            labelCell.Controls.Add(olabel);
            oText.ID = controlID;
            oText.CssClass = base.TextBoxCssClass;
            oText.Text = DefaultValue;
            oText.MaxLength = maxLength;
            if (multiLine)
            {
                oText.TextMode = TextBoxMode.MultiLine;
                oText.Rows = System.Math.Min(6, (maxLength + 60) / 60);
            }
            controlCell.Controls.Add(oText);
            row.Cells.Add(labelCell);
            row.Cells.Add(controlCell);
            return row;
        }

        private void SetControlAccess(string controlID, Boolean readOnly)
        {
            TextBox oText = (TextBox)this.FindControl(controlID);
            if (oText != null)
                oText.ReadOnly = readOnly;
        }

        private string GetControlString(string controlID)
        {
            TextBox oText = (TextBox)this.FindControl(controlID);
            if (oText != null)
                return oText.Text;
            else
                return "[TextBox '" + controlID + "' Not Found";
        }

        private void SetTextBoxValue(string controlID, string value)
        {
            TextBox oText = (TextBox)this.FindControl(controlID);
            if (oText != null)
                oText.Text = value;
            else
                oText.Text = "";
        }

        #endregion

        #region Ensynch Event Log

        private void SimpleLogFunction(string functionName, string Message, EventLogEntryType type, int eventID, short category)
        {
            using (StreamWriter mylog = new StreamWriter(@"C:\MyErrorLog.txt", true))
            {
                mylog.WriteLine(DateTime.Now.ToString("yyyy-MM-dd hh:mm:ss") + ", " + functionName + ", " + Message);
                mylog.Close();
            }
        }

        #endregion
We also need to add one more override method to our implementation, the CreateChildControls(), which will be called by the ILM interface to instruct our control to create its interface.
        protected override void CreateChildControls()
        {
            try
            {
                this.InitializeControls();
                base.CreateChildControls();
            }
            catch (Exception ex)
            {
                SimpleLogFunction("Activitites.CreateChildControls", ex.Message, EventLogEntryType.Error, 1000, 100);
            }
        }
Notice I also have a call to my diagnostic SimpleLogFunction() here too. This version writes to "C:\MyErrorLog.txt" just in case I make a mistake somewhere.
NOTE: Notice my extensive use of try-catch-finally blocks in my code. While these are not always the most efficient pieces of code, we are writing both a user interface and a workflow component and we don't want them to fail in production or we at least need them to fail gracefully. If you do any extensive SharePoint development you will also want to take this tack as all the interfaces with SharePoint are web service based and with the data being so dynamic requests can fail anywhere so you will want to trap them.
So let's go through each interface method and implement code on them one by one.
| Interface | Description |
| CreateChildControls | This routine, as mentioned above places our controls into the design service for us. We build our utility functions to create our controls and place them within a table so we have a nicely laid out format. |
| GenerateActivityOnWorkflow | This method will be called by ILM when the user hits the save button and ILM wants us to return an instance of our EnsynchDiagnosticActivity activity with the properties in it filled in with the values entered from the text boxes in our user interface. The code is shown below |
        public override SequenceActivity GenerateActivityOnWorkflow(SequentialWorkflow workflow)
        {
            try
            {
                this.SimpleLogFunction("GenerateActivityOnWorkflow", "Starting Activity Generation", EventLogEntryType.Information, 10000, 100);
                if (!this.ValidateInputs())
                {
                    return null;
                }
                EnSynch.Workflow.Activities.EnsynchDiagnosticActivity activity =
                                                    new EnSynch.Workflow.Activities.EnsynchDiagnosticActivity();
                this.SimpleLogFunction("GenerateActivityOnWorkflow", "Activity Created", EventLogEntryType.Information, 10000, 100);
                activity.LogActivityName = GetControlString("txtActivityName");
                activity.LogFolder = GetControlString("txtFilePath");
                activity.LogFile = GetControlString("txtFileName");

                this.SimpleLogFunction("GenerateActivityOnWorkflow", "Activity Properties Set", EventLogEntryType.Information, 10000, 100);

                return activity;
            }
            catch (Exception ex)
            {
                SimpleLogFunction("GenerateActivityOnWorkflow Error", ex.Message, EventLogEntryType.Error, 1000, 100);
                return null;
            }
        }
We create an instance of our activity, fill in the three properties we created (LogActivityName, LogFolder, and LogFile) by using a helper function, GetControlString() and then simply return it.
The next several sections cover each interface in detail:
| Interface | Description |
| LoadActivitySettings | This is called by ILM when it wants us to reload our user interface. It passes us a definition of our activity from its XAML definition. The code for LoadActivitySettings() is shown below |
        public override void LoadActivitySettings(SequenceActivity activity)
        {
            EnSynch.Workflow.Activities.EnsynchDiagnosticActivity activity2 =
                        activity as EnSynch.Workflow.Activities.EnsynchDiagnosticActivity;
            if (activity2 != null)
            {
                SetTextBoxValue("txtActivityName", activity2.IsDynamicActivity);
                SetTextBoxValue("txtFilePath", activity2.LogFolder);
                SetTextBoxValue("txtFileName", activity2.LogFile);
            }
        }
| Interface | Description |
| PersistSettings | Packages up the activity properties in an ActivitySettingsPartData collection and returns them to ILM for processing |
         public override ActivitySettingsPartData PersistSettings()
        {
            ActivitySettingsPartData data = new ActivitySettingsPartData();
            data["LogActivityName"] = GetControlString("txtActivityName");
            data["LogFolder"] = GetControlString("txtFilePath");
            data["LogFile"] = GetControlString("txtFileName");
            return data;
        }
| Interface | Description |
| RestoreSetting | Allows our interface to restore the values of our properties to the interface |
        public override void RestoreSettings(ActivitySettingsPartData data)
        {
            if (data != null)
            {
                SetTextBoxValue("txtActivityName", data["LogActivityName"] as string);
                SetTextBoxValue("txtFilePath", data["LogFolder"] as string);
                SetTextBoxValue("txtFileName", data["LogFile"] as string);
            }
        }
| Interface | Description |
| SwitchMode | This routine is called by ILM when it wants our control to switch from edit to view modes. Again, we make user of a helper function SetControlAccess() to set the access to read only in view mode. |
        public override void SwitchMode(ActivitySettingsPartMode mode)
        {
            bool flag = mode != ActivitySettingsPartMode.Edit;
            SetControlAccess("txtActivityName", flag);
            SetControlAccess("txtFilePath", flag);
            SetControlAccess("txtFileName", flag);
        }
| Interface | Description |
| Title | The title property provides the ILM interface with the title string that it will display for us on the design surface. |
         public override string Title
        {
            get
            {
                return "Ensynch Diagnostic Activity";
            }
        }
| Interface | Description |
| ValidateInputs | ILM calls this method as the first step when a user presses the Save button on our activity on the design surface. In our case we are going to assume that the user always puts valid file and folder names. By the way, remember that since the target folder and file are going to be on the server any validation we do would be against that machine and not necessarily the client we are working on. |
So we are going to simply return "true" from this routine.
        public override bool ValidateInputs()
        {
            return true;
        }
So that's it. We have completed the coding for our activity. We can now build our library.
Building the library and loading it so that ILM will see it
So for ILM to make use of our custom activity, at least in Beta 3, the library will need to be signed and placed in the Global Assembly Cache (GAC) as well the _app_bin folder of the SharePoint application the ILM portal is installed into.
To install your library into the GAC you can simply copy the library into the C:\WINDOWS\assembly folder or you can use gacutil.exe to do that for you. See this reference: http://support.microsoft.com/kb/315682 for complete instructions on signing and installing a library into the GAC.
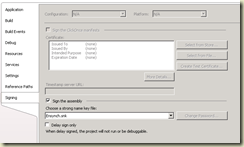
In my case I am adding my control to an existing library that was already been created and signed. The illustration below shows the property sheet for the signing page of my library.
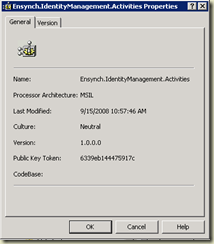
The first time you install your library in the GAC you will want to grab the public key token and version information. We will need that in the next step. From the C:\Windows\assembly right click on your library and select Properties.
So we are going to need the public key token: "6339eb144475917c" and the version: "1.0.0.0" for the next step.
Exposing our Activity to the ILM Process Designer
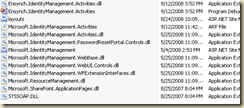
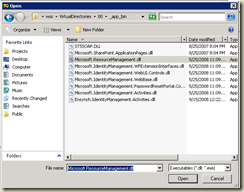
We are almost done. We need to copy our library to the _app_bin folder of our SharePoint web site. In my case this is in "C:\inetpub\wwwroot\wss\VirtualDirectories\80\_app_bin". I am going to copy two files to this folder; my DLL and also the PDB file for my library which will allow me to attach to the SharePoint executable (w3wp.exe) to debug my code in the event there are some bugs to check out. When I get done my _app_bin folder will look like:
Notice this includes all of the ILM libraries as well.
After installing our libraries we need to reset IIS and restart the ILM services in order for them to connect with our latest version of the library we just deployed. You can open a Command window on the SharePoint server and enter the: "iisreset" command and hit return. This will reset IIS. Next open the Services application from the Administrative Tools folder.
In the Services application you will want to restart the ILM services. In the illustration below they are the first two services in the listing "Microsoft Identity Integration Server" and "Microsoft ILM Common Services".
Figure 1‑20 - Services, ILM Services
NOTE: Every time you rebuild your library you will need to copy the new version to the GAC and to the _app_bin folder.
One more step to go. We have to tell ILM about our custom activity. To do this we need to add our activity definition to the configuration file ILM uses for its Activity definitions:
Microsoft.IdentityManagement.Activities.arp
The copy of “Microsoft.IdentityManagement.Activities.arp” we want to use is also located in the _app_bin folder of our SharePoint web site. There is a second copy located in the ILM folders in “Program Files\Microsoft Identity Management” which is not actually used by the portal.[1] Again, in my case this is in:
"C:\inetpub\wwwroot\wss\VirtualDirectories\80\_app_bin"
The configuration entry for our new activity is shown below:
<IdentityManagementActivity xmlns="http://schemas.microsoft.com/IdentityManagement/v1">
<Assembly>EnsynchILMActivity, Version=1.0.0.0, Culture=neutral, PublicKeyToken=6339eb144475917c</Assembly>
<TypeName>EnSynch.ILM.Activities.EnsynchDiagnosticActivityUI</TypeName>
<ActivityName>EnSynch.Workflow.Activities.EnsynchDiagnosticActivity</ActivityName>
<Title>Ensynch Diagnostic Activity</Title>
<Description>Ensynch ILM 2 Activity that writes Request data to a specified log file</Description>
<PartImageSmall>/_layouts/images/approval_small.gif</PartImageSmall>
<PartImageLarge>/_layouts/images/approval_large.gif</PartImageLarge>
<Categories>
<Category>Authentication</Category>
<Category>Authorization</Category>
<Category>Action</Category>
</Categories>
</IdentityManagementActivity>
The definition of all the fields is shown in the table below:
| Element Name | Description |
| <Assembly> </Assembly> | This is the date associated with the assembly that contains the custom activity. The contents should contain: Assembly name, Version, Culture, and the Public Key Token. Assembly Name: The assembly name is the name of the DLL minus the extension. In the example able the assembly DLL is named: Ensynch.IdentityManagement.Activities.dll. Version: The DLL version. In this example we are using version 1.0.0.0 Culture: The culture the assembly was created for. In this case the assembly is neutral. PublicKeyToken: If you are putting your assembly into the GAC you will need to strongly type your assembly and copy it into the GAC. You can look at the properties once you have installed it there and access the public key token and the version. |
| <TypeName> </TypeName> | The full class name (including the namespace) of the class that provides the visual component in the Process Designer |
| <ActivityName> </ActivityName> | The full class name (including the namespace) of the workflow activity class that is associated with visual component. |
| <Title></Title> | The title as you want it to appear in the designer’s activity list |
| <Description> </Description> | The title as you want it to appear in the designer’s activity list |
| <PartImageSmall> </PartImageSmall> | The URL to the small icon image file you want associated with your activity |
| <PartImageLarge> </PartImageLarge> | The URL to the large icon image file you want associated with your activity |
| <Categories> </Categories> | This the list of Process categories you designed or want your activity to appear in. Valid categories include: Authentication, Authorization and Action |
| <Category> </Category> | Element for each action to include. Must be a child of <Caterories> element. |
So now let's bring up the portal and test out our new activity. In my example I am trying to monitor the progress of the workflow properties through the "AD Outbound Sync Process", one of the processes that supports synchronizing various custom activities for an organization.
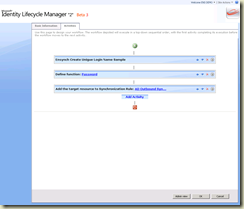
In the Activities Tab of the Process editor we can see the process as it exists right now:
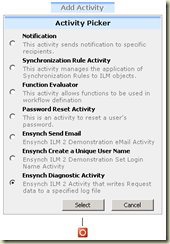
I am going to select the "Add Activity" option on the bottom which brings up a list of activities for me to select from:
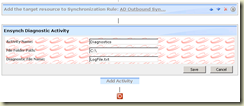
My activity is the one on the bottom. I select it and press Select. This brings up a copy of my activity in edit mode. Notice the three fields for setting our properties.
I'm going to take the default folder and file name but I'm going to change the activity name to "After Login Name" and then save it and move it up just after the first activity.
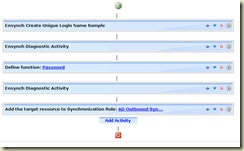
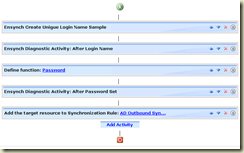
I'm going to do this after one more time and locate the second activity after the Password activity. My end result will look like this:
So this is nice but we can make a minor enhancement to our activity that will make it even better.
I'm going to change my Title property so that it includes the Activity Name we type in. My new code will look like this:
public override string Title
        {
            get
            {
                return "Ensynch Diagnostic Activity: " + GetControlString("txtActivityName");
            }
        }
This makes my activity list look as shown below which makes the activity easier to understand.
We press OK and then Submit and we are done with this step.
Testing out our Activity in Practice
Now we need to see if our activity works. Let's add a new user and see if we can follow the progress of the workflow in our log file.
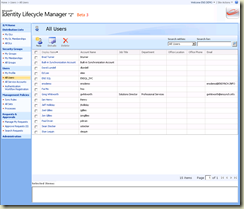
In the ILM Portal select "All Users" from the Quick Launch Bar and go to the "All Users" page.
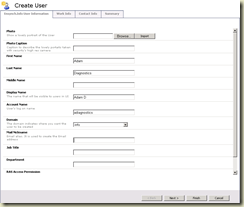
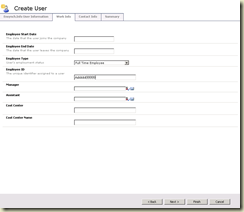
Pick the "New" user icon and create a new user. I am creating a full time employee named Adam Diagnostics as my test user. The next two shots show the data that I entered for Adam.
Figure 1‑28 - ILM Portal, Create User - Adam Diagnostic
Since I am done entering Adam's information I select the Finish button and then Submit from the summary screen.
Adam gets added to the list of users. The synchronization workflow will kick off at this point and run through all the activities in our process.
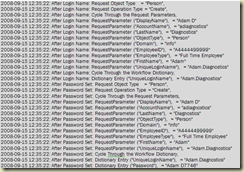
When we look at the log file we created from our custom activity we see that it has recorded the information we were interested in:
Note: As of this writing we now know that the ARP file will be replaced in the release candidate and will be stored in the ILM database.
So that's it. You have now created a custom activity for an ILM workflow.

